 1
 2
 3
 4
 5
 6
 7
 8
 9
10
11
12
13
14
15
16
17
18
19
20
21
22
23
24
25
26
27
28
29
30
31
32
33
34
35
36
37
38
39
40
41
42
43
44
45
46
47
48
49
50
51
52
53
54
55
56
57
58
59
60
61
62
63
64
65
66
67
68
69
70
71
72
73
74
75
76
77
78
79
80
81
82
83
84
85
86
87
88
89
90
91
92
93
94
95
96
97
98
99
100
101
102
103
104
105
106
107
108
109
110
111
112
113
114
115
116
117
118
119
120
121
122
123
124
125
126
127
128
129
130
131
132
133
134
135
136
137
138
139
|
model = dict(
type='MaskRCNN', # 检测器模型的名称
pretrained=
'torchvision://resnet50', # ImageNet预训练的backbone加载
backbone=dict( # backbone的配置
type='ResNet', # backbone类型,mmdet/models/backbones/resnet.py#304
depth=50, #backbone深度,ResNet和ResNext通常为50或101。.
num_stages=4, # backbone的阶段个数.
out_indices=(0, 1, 2, 3), # 每个阶段生成的输出特征图的索引
frozen_stages=1, # 前1个阶段的权重
norm_cfg=dict( # 归一化层的配置
type='BN', # norm layer的类型, BN or GN
requires_grad=True), # 是否训练BN中的gamma和betaBN
norm_eval=True, # 是否冻结统计 BN
style='pytorch'), # 主干的样式“ pytorch”表示第2步的步幅为3x3转换,“ caffe”表示第2步的步幅为1x1的转换。
neck=dict(
type='FPN', # neck是FPN. 还支持 'NASFPN', 'PAFPN', etc.
in_channels=[256, 512, 1024, 2048], # 输入通道,与backbone的输出通道一致
out_channels=256, # 金字塔特征图的每一级的输出通道
num_outs=5), # 输出数量
...
train_cfg = dict( # rpn和rcnn的训练超参数配置
rpn=dict( # Training config of rpn
assigner=dict( # Config of assigner
type='MaxIoUAssigner', # Type of assigner, MaxIoUAssigner is used for many common detectors. Refer to https://github.com/open-mmlab/mmdetection/blob/master/mmdet/core/bbox/assigners/max_iou_assigner.py#L10 for more details.
pos_iou_thr=0.7, # IoU >= threshold 0.7 will be taken as positive samples
neg_iou_thr=0.3, # IoU < threshold 0.3 will be taken as negative samples
min_pos_iou=0.3, # The minimal IoU threshold to take boxes as positive samples
match_low_quality=True, # Whether to match the boxes under low quality (see API doc for more details).
ignore_iof_thr=-1), # IoF threshold for ignoring bboxes
sampler=dict( # Config of positive/negative sampler
type='RandomSampler', # Type of sampler, PseudoSampler and other samplers are also supported. Refer to https://github.com/open-mmlab/mmdetection/blob/master/mmdet/core/bbox/samplers/random_sampler.py#L8 for implementation details.
num=256, # Number of samples
pos_fraction=0.5, # The ratio of positive samples in the total samples.
neg_pos_ub=-1, # The upper bound of negative samples based on the number of positive samples.
add_gt_as_proposals=False), # Whether add GT as proposals after sampling.
allowed_border=-1, # The border allowed after padding for valid anchors.
pos_weight=-1, # The weight of positive samples during training.
debug=False), # Whether to set the debug mode
...
)
test_cfg = dict( # 用于测试rpn和rcnn的超参数的配置
rpn=dict( # The config to generate proposals during testing
nms_across_levels=False, # Whether to do NMS for boxes across levels. Only work in `GARPNHead`, naive rpn does not support do nms cross levels.
nms_pre=1000, # The number of boxes before NMS
nms_post=1000, # The number of boxes to be kept by NMS, Only work in `GARPNHead`.
max_per_img=1000, # The number of boxes to be kept after NMS.
nms=dict( # Config of nms
type='nms', #Type of nms
iou_threshold=0.7 # NMS threshold
),
min_bbox_size=0), # The allowed minimal box size
rcnn=dict( # The config for the roi heads.
score_thr=0.05, # Threshold to filter out boxes
nms=dict( # Config of nms in the second stage
type='nms', # Type of nms
iou_thr=0.5), # NMS threshold
max_per_img=100, # Max number of detections of each image
mask_thr_binary=0.5)) # Threshold of mask prediction
dataset_type = 'CocoDataset' # 数据集类型
data_root = 'data/coco/' # 数据的根路径
img_norm_cfg = dict( # 图像规范化配置
mean=[123.675, 116.28, 103.53], # Mean values used to pre-training the pre-trained backbone models
std=[58.395, 57.12, 57.375], # Standard variance used to pre-training the pre-trained backbone models
to_rgb=True
)
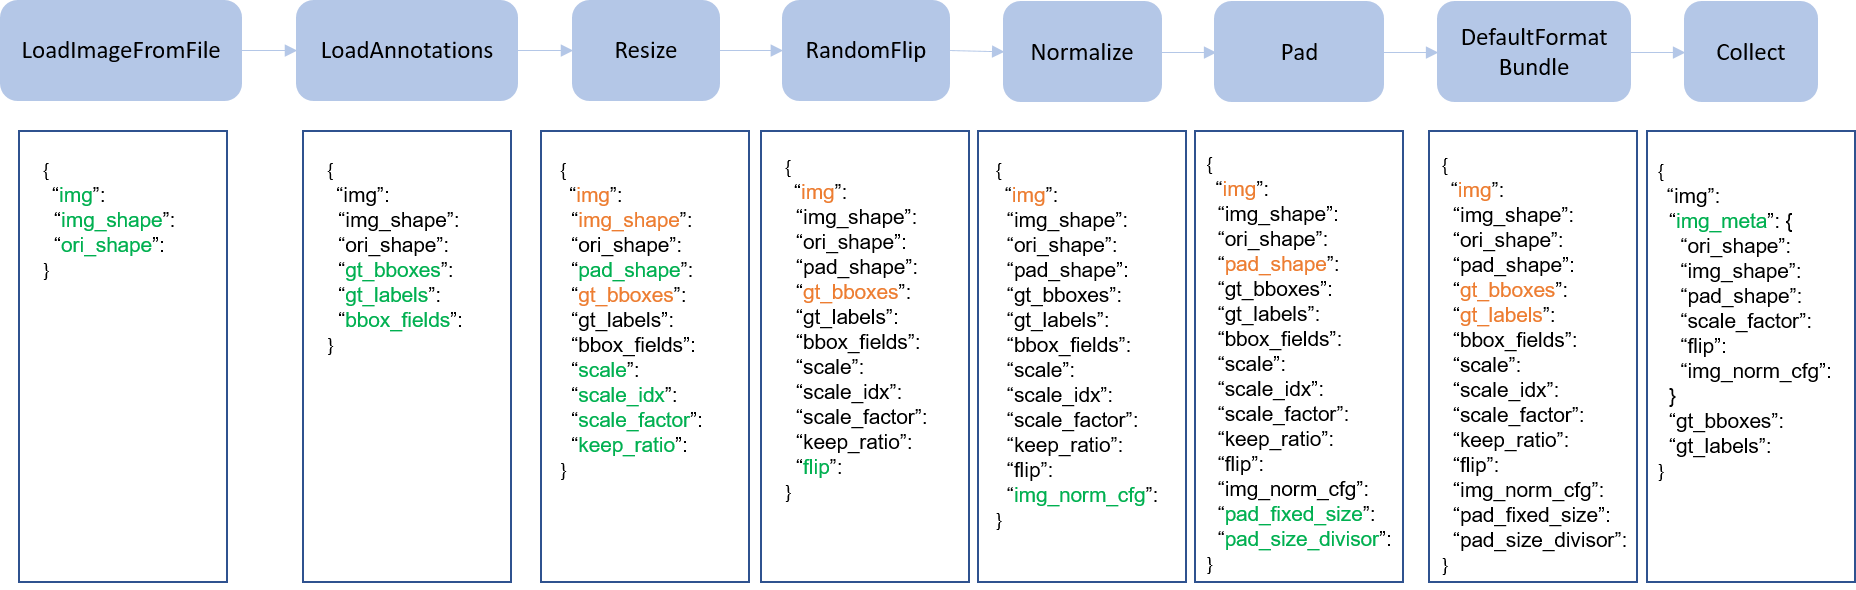
train_pipeline = [ # 训练管道
dict(type='LoadImageFromFile'), # 从文件路径加载图像
dict(
type='LoadAnnotations', # 为当前图像加载注释
with_bbox=True, #是否使用边界框, True for detection
with_mask=True, #是否使用实例掩码, True for instance segmentation
poly2mask=False), # Whether to convert the polygon mask to instance mask, set False for acceleration and to save memory
...
]
test_pipeline = [ # 测试管道
dict(type='LoadImageFromFile'), # First pipeline to load images from file path
dict(
type='MultiScaleFlipAug', # An encapsulation that encapsulates the testing augmentations
img_scale=(1333, 800), # Decides the largest scale for testing, used for the Resize pipeline
flip=False, # Whether to flip images during testing
...
]
data = dict(
samples_per_gpu=2, # 单个GPU的批处理大小
workers_per_gpu=2, # 为每个GPU预取数据的辅助进程
train=dict( # 训练数据集配置
type='CocoDataset',
ann_file='data/coco/annotations/instances_train2017.json', # 批注文件的路径
img_prefix='data/coco/train2017/', # 图像路径前缀
pipeline=[ # pipeline, this is passed by the train_pipeline created before.
...
]),
val=dict( # 验证数据集配置
type='CocoDataset',
ann_file='data/coco/annotations/instances_val2017.json',
img_prefix='data/coco/val2017/',
pipeline=[ # Pipeline is passed by test_pipeline created before
...
]),
test=dict( #测试数据集配置, modify the ann_file for test-dev/test submission
type='CocoDataset',
ann_file='data/coco/annotations/instances_val2017.json',
img_prefix='data/coco/val2017/',
pipeline=[ # Pipeline is passed by test_pipeline created before
...
],
samples_per_gpu=2 # Batch size of a single GPU used in testing
))
evaluation = dict( # 构建评价值钩子的配置,
interval=1, # Evaluation interval
metric=['bbox', 'segm']) # Metrics used during evaluation
optimizer = dict( # 构建优化器的配置
type='SGD', # Type of optimizers, refer to https://github.com/open-mmlab/mmdetection/blob/master/mmdet/core/optimizer/default_constructor.py#L13 for more details
lr=0.02, # Learning rate of optimizers, see detail usages of the parameters in the documentaion of PyTorch
momentum=0.9, # Momentum
weight_decay=0.0001) # Weight decay of SGD
optimizer_config = dict( # 构建优化器挂钩的配置
grad_clip=None) # Most of the methods do not use gradient clip
lr_config = dict( # 用于注册LrUpdater钩子的学习率调度程序配置
policy='step', # The policy of scheduler, also support CosineAnnealing, Cyclic, etc. Refer to details of supported LrUpdater from https://github.com/open-mmlab/mmcv/blob/master/mmcv/runner/hooks/lr_updater.py#L9.
warmup='linear', # The warmup policy, also support `exp` and `constant`.
warmup_iters=500, # The number of iterations for warmup
warmup_ratio=
0.001, # The ratio of the starting learning rate used for warmup
step=[8, 11]) # Steps to decay the learning rate
runner = dict(type='EpochBasedRunner', max_epochs=12) # Runner that runs the workflow in total max_epochs
checkpoint_config = dict( # Config to set the checkpoint hook, Refer to https://github.com/open-mmlab/mmcv/blob/master/mmcv/runner/hooks/checkpoint.py for implementation.
interval=1) # The save interval is 1
dist_params = dict(backend='nccl') # 参数设置分布式训练,端口也可以设置
load_from = None # 从给定路径将模型作为预先训练的模型加载。这将不会恢复训练。
resume_from = None # 从给定路径恢复检查点开始训练
workflow = [('train', 1)] # Workflow for runner. [('train', 1)] means there is only one workflow and the workflow named 'train' is executed once. The workflow trains the model by 12 epochs according to the total_epochs.
work_dir = 'work_dir' # Directory to save the model checkpoints and logs for the current experiments.
|